-
Explore advances in RealityKit
Discover the latest advancements in RealityKit designed to make your apps and games more immersive and realistic than ever. Explore powerful new capabilities including interactive cloth simulations, NavMesh pathfinding, mixed reality lighting, and customizable reverb meshes for enhanced spatial audio. Elevate your visual fidelity with improved shadows, character rendering enhancements, and support for Gaussian splatting.
Chapters
- 0:00 - Introduction
- 2:00 - Lighting and shadows
- 7:44 - Navigation mesh
- 11:01 - Cloth simulation
- 13:42 - Performance
- 17:09 - 3D Gaussian splats
- 19:08 - Immersive audio
- 22:42 - Next steps
Resources
Related Videos
WWDC26
-
Search this video…
Hi, my name is Dennis and I'm a software engineer on the RealityKit team. Welcome to my session: "Explore advances in RealityKit" where I'll be introducing you to some of the latest advancements in RealityKit.
In 2019 we introduced RealityKit, a framework that enables you to easily build 3D spatial experiences across a wide range of Apple platforms. With RealityKit you can build your apps and games once and deploy them to visionOS, iOS, iPadOS, macOS, and tvOS.
And this year we are introducing a better way to build these apps and games with Reality Composer Pro 3.
Check out these sessions to learn more about Reality Composer Pro 3: from its fast, iterative scene editing tools to its powerful graph interfaces for modeling complex particle and character behaviors. And thanks to the amazing feedback we got from all of you we are adding exciting new features to RealityKit this year. These features will make it easier than ever to craft high-fidelity, immersive experiences. To start I'll go over the advancements we made to RealityKit's lighting and shadows, enabling more realistic effects that blend seamlessly into your world. Then I'll introduce RealityKit's navigation mesh as a way to help your players and NPCs navigate the worlds you have crafted.
I'll show you how to build elaborate cloth simulations that can be used to dress your virtual furnishings and characters.
If you're not careful, utilizing these features can hinder performance. To help you tackle this I'll cover the tools available to you to both mitigate and monitor such issues.
Once we have a handle on performance I'll demonstrate how you can bring a piece of the real world into your apps and games with RealityKit's ability to render 3D gaussian splats. Finally, I'll talk about RealityKit's immersive audio features and how they can improve the spatial realism of your virtual worlds. Let's begin right away and go over what's new in RealityKit's lighting and shadows through a new game we have built: Chaparral Village. In this game, a mysterious village is transported into the player's world. They are then shrunk down by an owl and must navigate their way through this village in order to get to the alchemy area where they'll brew a number of potions under the owl's direction.
Let's take a look inside the alchemy area of Chaparral Village.
Hmmm, this looks pretty good but it seems a little dark in some of the corners.
Here, we can take advantage of RealityKit's support for lightmaps to enhance the lighting of the area's interior.
Using the light baker in Reality Composer Pro 3 I'll create an indirect lighting lightmap and apply it to the scene.
There, the corners and shadows have brightened as they're now correctly seeing contributions from reflected light. RealityKit's API supports attaching your own lightmap textures for: indirect lighting, ambient occlusion, and beauty. But to get the best experience I recommend using Reality Composer Pro 3's light baker to generate these instead. To learn more about light baking in Reality Composer Pro 3 please check out the session: "Iterate your spatial scenes faster with Reality Composer Pro 3." Lightmaps help you render complex lighting effects, but only for static lighting. We can, however, bring one of these complex effects to dynamic lights with RealityKit's soft shadows. By default, the shadows in RealityKit have hard edges. This is accurate in some scenarios. For instance, if the light source is infinitesimally small. But this is no longer accurate when the light has some area. Now, the shadow cast exhibits softer edges as only some of the light is obscured in these regions, also known as the penumbra of the shadow. The size of the penumbra is influenced by the light's area. The greater the light's area, the greater the penumbra.
Here is the hearth in the alchemy area. I am currently simulating the light coming from the hearth using a spotlight. Let's make the shadows cast by this spotlight soft.
I'll start by getting the hearth's spotlight's shadow. I'll then update the shadow's lightSize variable. This represents the diameter, in meters, of the light. By default it is set to 0 producing a hard shadow. I'll update it to 0.7 meters to produce a nice soft shadow.
I also have to set the shadow's quality. This variable controls the number of samples used to calculate the soft shadow. Setting the quality to high can produce more pleasing results but with a greater performance penalty. For this reason, I'll stick to medium as this still looks good at the viewing distance.
Note that if I had set the quality to low, the shadow would be hard regardless of the light size. The quality must be set to either medium or high to achieve soft shadows.
Finally, I add the shadow back to the hearthSpotLight entity.
Now, if I apply the changes to the shadow, we can see the shadows have softened, especially the shadow cast by the cauldron.
So far all of the lighting I've shown you is casting onto virtual objects. But what if we wanted your lights to extent beyond the virtual world? To cast lights onto your world? Here is a planetarium projector I've built with RealityKit. As the projector spins, my real world environment is painted with virtual stars and nebulae. Notice how they realistically conform to the walls in my room. I was able to achieve this effect with two RealityKit features: projective textures and physical space lighting. Let's first take a look at projective textures. Imagine taking a flashlight and a piece of film. If I shined light through the film the image on the film will now appear on whatever surface the flashlight is pointing at. This effect is what RealityKit's projective texture feature emulates. With projective textures you can render various effects from the pattern caused by light shining through an intricate window or, when animated, the bright undulating caustics seen on the sea floor. For my virtual planetarium, the stars and nebulae are attached as projective textures to rotating spotlights. To build one of these spotlights I'll start by creating an Entity and attaching a SpotLightComponent to it.
I'll make sure the color is white so I don't apply a tint to the projective texture. I'll tweak the other parameters as necessary for the room I am in.
For example, a larger room may need more intensity to make the projective texture visible on the walls. I'll then generate a stars and nebulae texture. This will be the texture that I project from the planetarium.
Finally, I'll create and attach my SpotLight's projectiveTexture component and attach the texture I just generated.
Here we can see the stars and nebulae projecting onto virtual walls.
But how do we get them to project onto the walls in my real room? For that, we must enable physical space lighting. This feature enables virtual lights to interact with system environments or the world around you using RealityKit's scene understanding mesh.
Currently, physical space lighting is only supported for spotlights and point lights.
Let's enable this feature on our planetarium's spotlights.
Here we have the spotLightEntity from earlier. To enable physical space lighting all we have to do is add the SpotLight's SurroundingsLight component. That's it.
Now the the stars and nebulae project onto my real world room.
We have also enabled this physical space lighting effect in the alchemy area of the Chaparral village. Speaking of which, how does the player's character choose the path to take to the alchemy area? This path is determined using RealityKit's navigation mesh.
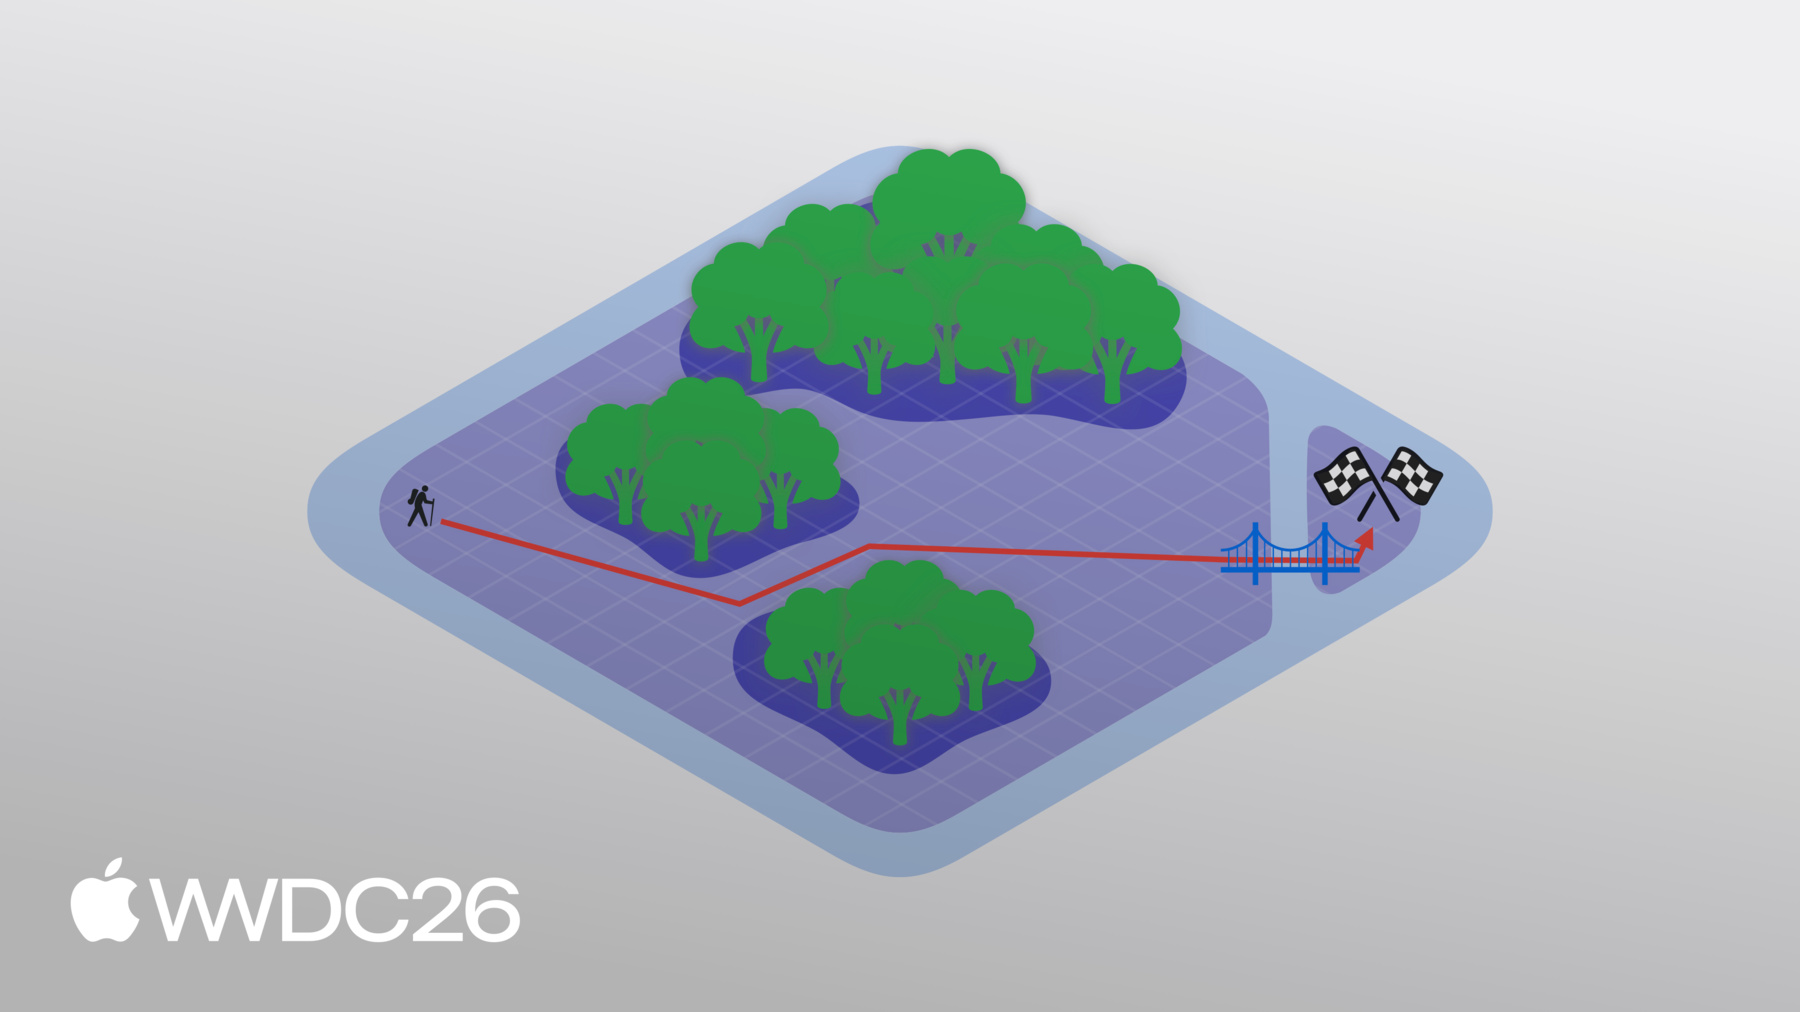
Let me illustrate how such a mesh works with a simple example.
Imagine a scene where I start off on one side of the map and my goal is to make it to the flags on the other side. Seems simple enough. But oh no! Some obstacles have appeared in my way! I can use a navigation mesh to define the traversable parts of this scene, avoiding the dense forests. RealityKit can then use this navigation mesh to calculate a path to the flag. But what if I don't want to rule out the forests entirely? I can make my way through the forests, I'll just be a slower. We can reflect this in the navigation mesh by giving these regions a different traversal cost. This will reflect the lower speed I'll go at when going through the forest. Now, if I calculate a path it will take into account this cost and pick a new route for me. But what's this? A rift has broken up my scene and left the flag stranded. This has led to two regions represented with two disconnected navigation meshes. But not to worry, I can connect them using an off mesh connection, in this case a bridge. The placement of this connection, however, means that a new path must be calculated.
To use RealityKit's navigation mesh, you first need to define a NavigationMeshResource. This holds the geometric data for the navigation mesh, including labeled areas, custom flags for those areas, and the connection between areas. This can either be defined using the Swift API or in Reality Composer Pro 3. To learn how to build navigation meshes in Reality Composer Pro 3 check out the session: "Supercharge your spatial workflows with Reality Composer Pro 3." This NavigationMeshResource is then fed into a NavigationComponent. This component has a filter that is used to define the cost of areas, and which areas to include or exclude given the area's flag. The NavigationComponent is then used by the NavigationController to calculate the path. Either synchronously or asynchronously.
In Chaparral Village the navigation mesh is queried in the navigate entity extension function.
Within navigate I first create a NavigationController. The controller requires an entity with a navigation component. I'll get this from the entity itself. I'll then use the async computePath function to get the path from the entity's current position to a desired position where the player tapped.
If the result is nil, then the NavigationController could not find a valid path and we return.
If this array is empty, then we have reached our destination and we return as well.
Otherwise, this array holds a collection of path nodes representing the path the NavigationController computed.
I'll iterate over these nodes so that I can determine the final path the entity should take.
If it's a node on the navigation mesh itself, I can just append its position to our path. If it's an off-mesh connection, then we have to traverse a ladder. I'll handle this situation separately.
Here, we can see the player's character navigating the village with RealityKit's navigation mesh. Once they reach the top they must walk through two curtains that adorn the entrance to the alchemy area.
These curtains were built with RealityKit's advanced cloth simulation.
In RealityKit's cloth simulation the cloth is described through a mesh, where the vertices represent particles and the edges connecting the vertices represent springs.
Given a mesh with enough vertices, RealityKit can accurately simulate everything from the flow of this golden dress to these bed covers.
See how, as I pull off these covers, they realistically crease and fold, all in real time.
To use RealityKit's cloth simulation you need to add a cloth body component to your scene. This component represents cloths themselves. It contains a reference to its material properties and a cloth mesh resource that describes the layout of the particles and springs. You can also add a cloth collider component which represent the rigid objects that a cloth can collide with, like the bed or mannequin from earlier. Just as with the cloth body component, it contains a reference to its material properties and the geometry of the collider itself. To run the simulation you need to add the cloth simulation component. This component contains an array of materials that are referenced by the cloth bodies and colliders. Each material has a set of properties like spring stiffness and friction. The specific properties depend on whether it's describing a cloth or cloth collider material. The simulation itself also has a number of properties that effect all descendent entities involved in the cloth simulation. Some of these properties include which solver to use, the gravity to apply, and how big of a time step to take in the simulation.
In Chaparral Village, RealityKit's cloth simulation is used to adorn curtains to the entrance of the alchemy area. But how do we implement the hoops that keep the curtains from falling down? For that we use the custom curtain pin component.
Here we iterate over pins, an array that holds a tuple of these custom components, and their corresponding entity.
We use this entity's position as the position at which we are pinning the curtain. Then we build a sphere to represent the size of the pin itself. The size is controlled through the custom component. We use the position and the sphere we just created to get an array of all the vertices that should be pinned or made immovable.
We then set these vertices to kinematic. Kinematic vertices can only be moved by an entity's transform and not by the cloth simulation itself. This will essentially keep them in place. And with that, we can pin the curtains to the alchemy area at the position of the hoops and keep them from falling over.
At this point I have gone over a number of features that, when not used with care, may come at a performance cost. To help tackle this I'll first cover a technique that can be used to improve performance and then how you can track a performance indicator of your apps and games so that they can adapt accordingly. Mesh level of detail refers to the process of rendering geometry at a lower detail such that the visual impact is negligible.
To demonstrate this I'll use the cauldron from the alchemy area in Chaparral Village. By convention, these so-called "levels of detail," or LODs, start at index 0. Notice how the geometric complexity of the cauldron decreases as I go to LOD one, two, three, four, and finally five. At LOD 5 the cauldron looks pretty bad. However, if I scale it down as if the cauldron were very far away, I can now compare it to LOD 0. The difference is negligible and we require less compute to render the cauldron.
Let's see how we can set up LODs in RealityKit.
The different LODs are specified as arrays of entities. In this example I'll have 3 different LODs each made up of one entity.
Then I will create the entity that will hold the LODs themselves and switch between them.
But how does RealityKit know which LOD to use? For that I need to pick a switching algorithm.
I will walk you through two of RealityKit's switching algorithms. The first one is based on the distance to the camera. The further away from the camera the entity is, the higher the LOD we can select. The second one is based on the screen area the entity takes up. The less area the entity takes up on screen, the higher the LOD we can select.
Here, I am using the LevelOfDetailComponent's addByCameraDistance convenience function to setup camera distance based LODs.
For each LOD, I specify a max distance at which I will use this LOD. Once the entity goes beyond this distance, it'll switch over to the next LOD.
For the last LOD, I want to set the max distance to infinity to indicate that, no matter how far the entity is beyond the previous threshold, I will be using this LOD.
If I want to switch LODs based on screen area then I use the addByScreenArea convenience function. Here, I specify a minimum area as a fraction of the screen area. If the entity takes up less than this specified screen area, it'll switch over to the next LOD.
Using LODs in your apps and games is a great way to improve performance. However, it is also important to react in your apps and games when performance is becoming a problem.
This can be done by registering an observer on the thermalStateDidChange notification. This will allow me to know if the device's processor is running too hot. If a change in the thermal state occurred, I can query the current state. If it's nominal or fair, then my mitigation efforts succeeded and the app or game can keep running as is.
However, if it's serious or critical, then I should take steps to improve performance, like making the LOD switching thresholds more aggressive, or lowering the quality of shadows. Keeping a handle on the performance of your apps and games is important as it ensures the comfort of your users and enables you to take advantage of other advanced RealityKit features.
One such feature is RealityKit's ability to render 3D gaussian splats.
3D gaussian splats are a high performance, high quality technique to render volumetric data captured from the real world. With this technique, 3D scenes are represented as a collection of 3D gaussians.
You can think of these as ellipsoids with different levels of opacity. To render such a scene we would need to evaluate, at each pixel, a ray along all the gaussians. There are a number of optimizations that can be made when doing this, and if you use RealityKit's API, it will handle them for you. To see this API in action, download the gaussian splat sample from developer.apple.com.
Here I have the sample running on an Apple Vision Pro. Notice the fine details of the potted succulent. We were able to capture the geometric complexity of the plants and the soil they sit in, and RealityKit was able to render them both flawlessly.
RealityKit API does not assume a specific file format for gaussian splats. Instead, you have to provide buffers that describe the properties of the splats in a capture. Specifically: their position, scale, rotation, opacity, and their spherical harmonics.
The spherical harmonics allow you to control the color of an ellipsoid depending on the viewing direction. We also need to specify a degree for the spherical harmonics. This articulates the number of color variations as you move around the ellipsoid. For instance, a degree of 0 implies a solid color at all viewing directions. I can then assimilate all of these buffers into a BufferResource and create a GaussianSplatResource. From this resource, I'll create a GaussianSplatComponent. Then, to render the 3D gaussian splats, I will attach the component to an entity in my scene. With that, you are able to bring 3D gaussian splats into your virtual experiences, enabling you to bring high-fidelity captures of real world objects to your users. Finally, let's go over RealityKit's new immersive audio features, enabling enhanced realism for your Apple Vision Pro apps and games through sound.
Spatial audio rendering is an important aspect of sound design for spatial computing.
Accurate direction and timing of the direct path and the reflection path are required for a realistic spatial audio experience. As a person and the audio source move around the environment, the timing and orientation must be updated accordingly to maintain realism.
The geometry and materials of your environment have a big impact on how an audio source sounds.
For example, the same audio source will sound very different if it's in a small living room or a large museum.
We can use RealityKit to simulate the reflections and reverb of our environment using raytraced geometrical acoustics.
For example, in this kitchen and dining room scene, we can use RealityKit's custom reverb mesh to acoustically model the wood floors, plaster walls, and stone countertop. Depending on where a person and the audio source are in the scene, they will take on the reverb appropriate for their placement.
To show this feature in action we are releasing a sample that takes advantage of the custom reverb mesh. In this sample, you can hear a virtual band play as you navigate around a large museum environment. You can even control the sound coming from each instrument independently. Thanks to RealityKit's custom reverb mesh, the sounds emitted from these instruments realistically scatters around the museum before they hit your ears.
This can only truly be experienced on an Apple Vision Pro. Download the sample from developer.apple.com and give it a try! To create a custom reverb mesh, you start by defining the geometry of the scene with a ReverbMeshResource. This can be created from a mesh descriptor or mesh resource. But the easiest way to get started is with a shoebox, which is a box with faces pointed inward. I'll set it to be 5 meters wide, 4 meters tall and 6 meters deep.
I'll then combine this mesh with the dryWall preset audio material to create a simulated reverb.
Finally I'll use this reverb to create a reverb component and attach it to an entity in the scene. This will allow the reverb mesh to take effect. But I'm not limited to just the built-in preset materials. Let's see how I can create custom materials for my custom reverb mesh. I'll start by defining a thickCarpet material. I want this material to be more absorbent than the preset carpet material so I call scalingAbsorption and increasing the absorption a little bit for all frequencies. Next, I'll create a bookshelf material, but this time from scratch. This means we need to define both the absorption coefficients and scattering coefficients.
These define how much sound energy is absorbed or scattered at different frequencies. I'll start by setting the absorption coefficients for the 10-band center frequencies. But what if I only know the coefficients for specific frequencies? Then, I'll define the scattering coefficients for a few specific frequencies. RealityKit will then extrapolate and cover the entire audible frequency spectrum. Finally, I create the bookshelf material itself by composing the absorption and scattering data.
Please note that this only works in immersive spaces. If you are in a shared space the system's room-sense reverb geometry will be used instead. This is a reverb mesh that the Apple Vision Pro has built based on your real-world surroundings.
I've covered a lot of material in this session, but this only scratches the surface of what RealityKit has to offer this year. There are many more features that we are also releasing this year: Like coordinated multi-source audio that enables precise, synchronizing audio playback across multiple entities; high quality character rendering, that provides subsurface scattering and advanced hair shaders to bring your characters to life; portal customizations, where you can create custom portal materials to alter a portal's opacity and shape; and much more.
I recommend that you visit the Apple developer portal at developer.apple.com to download the samples from this session so that you can see some of these exciting new RealityKit features in action. And while you are there, make sure to check out Reality Composer Pro 3, a major new release of Reality Composer Pro that enables you to better take advantage of RealityKit's features. You can check out these sessions to learn more about Reality Composer Pro 3 and all its new capabilities. I can't wait to see what amazing spatial experiences you build with RealityKit. Thank you for watching!
-
-
4:02 - Soft shadows
// Enable soft shadows for the hearth spotlight guard var shadow = hearthSpotlight.components[SpotLightComponent.Shadow.self] else { // handle error } shadow.lightSize = 0.7 // meters shadow.quality = .medium // or .high // shadow.quality = .low // will result in hard shadows hearthSpotlight.components.set(shadow) -
6:13 - Projective textures
// Create one of the planetarium spotlights let spotLightEntity = Entity() spotLightEntity.components.set(SpotLightComponent( color: .white, intensity: intensity, innerAngleInDegrees: innerAngle, outerAngleInDegrees: outerAngle, attenuationRadius: attenuationRadius, )) let projectiveTexture: TextureResource = generateStarsAndNebulaeTexture() spotLightEntity.components.set(SpotLightComponent.ProjectiveTexture( texture: projectiveTexture )) -
7:13 - Physical space lighting
// Enable physical space lighting spotLightEntity.components.set(SpotLightComponent.SurroundingsLight()) -
9:46 - Querying the navigation mesh
// Querying the navigation mesh in Chaparral Village extension Entity { public func navigate(/* ... */) async { let navigator = try! NavigationController(entity: self) guard let result = await navigator.computePath(from: fromPosition, to: toPosition) else { return } if result.isEmpty { return } for node in result { switch node.category { case .meshPoint: finalPath.append(node.position) case .offMeshConnection: // handle ladders } } } } -
12:51 - Pinning cloth to anchor points
// Pin the curtains to the Alchemist's lab for (pin, pinComponent) in pins { let position = pin.position(relativeTo: event.entity) let selectionSphere = ClothSphereShape(radius: pinComponent.radius) let vertices = clothMesh.vertices(in: .sphere(selectionSphere), center: position) clothBody.motionTypes.set(vertexIndices: vertices, value: .kinematic) } -
14:42 - LOD by camera distance
// Create entity with LODs let lod0 = [ModelEntity(mesh: lodMesh0)] let lod1 = [ModelEntity(mesh: lodMesh1)] let lod2 = [ModelEntity(mesh: lodMesh2)] let entity = Entity() LevelOfDetailComponent.addByCameraDistance(to: entity, levels: [ (entities: lod0, maxDistance: 1.0 /* meters */), // highest detail (entities: lod1, maxDistance: 5.0), // medium detail (entities: lod2, maxDistance: .infinity), // lowest detail ]) -
15:58 - LOD by screen area
// Create entity with LODs let lod0 = [ModelEntity(mesh: lodMesh0)] let lod1 = [ModelEntity(mesh: lodMesh1)] let lod2 = [ModelEntity(mesh: lodMesh2)] let entity = Entity() LevelOfDetailComponent.addByScreenArea(to: entity, levels: [ (entities: lod0, minArea: 0.2 /* fraction of screen area */), // highest detail (entities: lod1, minArea: 0.1), // medium detail (entities: lod2, minArea: 0.01), // lowest detail ]) -
16:26 - Responding to thermal state changes
// Respond to changes in device thermal state NotificationCenter.default.addObserver(of: ProcessInfo.self, for: .thermalStateDidChange) {_ in switch ProcessInfo.processInfo.thermalState { case .nominal, .fair: // Stay the course case .serious, .critical: // Improve performance by: // More aggressive LOD switching // Lower shadow quality } } -
18:44 - Creating a Gaussian splat
// Create Gaussian splat resource and component let resource = try GaussianSplatResource.BufferResource(count: splatCount, position: positionBuffer, scale: scaleBuffer, rotation: rotationBuffer, opacity: opacityBuffer, sphericalHarmonics: (sphericalHarmonicsBuffer, degree)) let splatResource = GaussianSplatResource(resource) let splatComponent = GaussianSplatComponent(splatResource) splatEntity.components.set(splatComponent) -
20:49 - Creating a custom reverb mesh
// Create and use custom reverb mesh let mesh: ReverbMeshResource = .shoebox(size: [5, 4, 6]) let reverb: Reverb = .simulated(mesh: mesh, materials: [.dryWall]) entity.components.set(ReverbComponent(reverb: reverb)) -
21:33 - Creating custom reverb materials
// Create custom materials for custom reverb mesh

let thickCarpet: Audio.Material = .carpet.scalingAbsorption {freq in 0.1 }

let bookshelf: Audio.Material

// Absorption coefficients by center frequency:
// 31.5Hz, 63Hz, 125Hz, 250Hz, 500Hz, 1kHz, 2kHz, 4kHz, 8kHz, 16kHz
let bookshelfAbsorption = Audio.Absorption(
    [0.10, 0.15, 0.28, 0.20, 0.15, 0.10, 0.10, 0.07, 0.07, 0.05])

// Scattering coefficients for: 500Hz, 1000Hz, 4000Hz
let bookshelfScattering = Audio.Scattering([500: 0.5, 1000: 0.6, 4000: 0.7])

bookshelf = .init(absorption: bookshelfAbsorption,
              scattering: bookshelfScattering)
-
-
- 0:00 - Introduction
Overview of the new RealityKit features introduced this year, including lighting and shadows, navigation mesh, cloth simulation, performance tools, 3D Gaussian splats, and immersive audio.
- 2:00 - Lighting and shadows
Explore RealityKit's updated lighting and shadow capabilities, including lightmap support for indirect lighting and ambient occlusion, soft shadows for dynamic lights, projective textures, and physical space lighting that lets virtual lights interact with real-world environments.
- 7:44 - Navigation mesh
Learn how to use RealityKit's navigation mesh to define traversable paths for characters and NPCs. Covers NavigationMeshResource, NavigationComponent, NavigationController, and how to query and iterate path nodes asynchronously.
- 11:01 - Cloth simulation
Discover how to add realistic cloth simulation to your scenes using ClothBodyComponent, ClothColliderComponent, and cloth mesh resources. Includes how to pin cloth vertices to anchor points using kinematic motion types.
- 13:42 - Performance
Cover performance optimization techniques, including mesh level of detail (LOD) using LevelOfDetailComponent with camera-distance and screen-area algorithms, and how to monitor and respond to device thermal state changes.
- 17:09 - 3D Gaussian splats
Learn how to render high-fidelity real-world captures using RealityKit's 3D Gaussian splat support. Covers how to construct a GaussianSplatResource from position, scale, rotation, opacity, and spherical harmonics buffers, and attach it via GaussianSplatComponent.
- 19:08 - Immersive audio
Explore RealityKit's immersive audio features for Apple Vision Pro, including custom reverb meshes that model the acoustic properties of virtual and real environments. Covers ReverbMeshResource, built-in preset materials, and creating custom materials with absorption and scattering coefficients.
- 22:42 - Next steps
Recap of session topics and pointers to related sessions, sample code, and documentation to explore more of what RealityKit has to offer this year.